Swedish Leg Massage-The Final Part of Your Circulatory Massage
FINALLY! We have made it to the final part of our circulatory massage, the leg. We started with Back Massage, went up to Neck and Face Massage, came back down to do the Chest and Stomach Massage, over to the Arm Massage, ended there with the Hand Massage and here we are to finish with the leg.

Legs work all the time non-stop. Running, walking, and even standing require leg muscle to work and they also contain some of the biggest muscles on your body.
Leg massages also have a very important element to getting a massage. It should be obvious that your feet are the most bottom portion of your body. Getting blood to your feet is rather easy, gravity can simply get blood there. The biggest problem with your legs is getting blood and lymph UP back toward the heart. Here is where vericose and spider veins and such come from. This is what gives a Swedish Massage the term Circulatory Massage. Massaging the leg will give great relief and relaxation while helping circulation in your body.
So lets get started. Note that guys with hair on their legs need, and appreciate, more oil that girls with no hair. Otherwise your massage turns into a waxing.
See that the person’s feet are a foot or so apart. Apply oil to the entirety of the front and sides of the right leg.
1. For the main stroke on the leg, it is important to stand or kneel in exactly the right place.If you are using a table stand near the person’s right foreleg and turn forty-five degrees towards the opposite end of the table; in other words you should be roughly facing the pelvic region of the person’s body. Have your weight on your right foot and place your left foot a couple of feet towards the head of the table.If you are working on the floor kneel alongside the person’s foreleg. Be facing in the direction of the person’s head; have your knees approximately parallel to his or her knees.Now place your tight hand across the person’s ankle with fingertips facing your side of the table. Place your left hand just in front of the right with fingertips facing the opposite side of the table. (If you are working on the left leg the right hand goes in front of the left hand.)Both hands should be cupped, with fingers together; the thumb of the left hand should be resting against the little finger of the right.Now glide both hands from one end of the leg to the other. The movement should be slow and steady. Go lightly over the knee but elsewhere use plenty of pressure; this can be most easily done by leaning slightly over the leg and thus using the natural effect of your own weight rather than an increased muscular effort. If you are standing, transfer your weight from your right to your left foot as you move. If kneeling, you may, if you wish, raise yourself slightly upwards and forwards in order to keep the upper part of your own body directly above your hands as long as possible.The trickiest part of the stroke comes when you reach the top of the person’s leg. Here the hands divide and go their separate ways. The left hand continues upwards until the fingertips find the hip bone. It then follows the line of the hip all the way down to the table; as it does so, the fingertips with a slight extra pressure outline the curve of the bone itself.Then, once the fingertips have actually made contact with the table, the left hand begins to move along the side of the leg back towards the foot.At the same time the right hand moves more slowly down the inside of the thigh. There is a natural crease in the skin between the pelvis and the inside of the thigh; the fingertips should follow this crease, making a detour around a male’s genitals where necessary, straight down to the table. At this point the right hand is also ready to head back towards the foot. Now as you gradually transfer your weight back on to your right foot, pull both hands along the sides of the legs all the way to the ankle. Keep the fingertips on both sides moving against or just above the surface of the table. Use less pressure than going up; however, let the person feel a definite pull as your hands move down.When you move your hands into place to repeat the stroke be sure to end up with the left hand higher up on the foreleg than the right. Otherwise the hands will be in each other’s way when it is time for them to divide. For the same reason, when you later move to the person’s left leg you must there place your right hand higher up than your left.I find that there are two secrets to making this stroke feel exactly right. The first is to articulate the hip bone as carefully and as precisely as possible with the left hand. For the person this will feel as if you are drawing a picture of his body’s structure at this point, a sensation which most people find particularly pleasant. The second secret is to pace the movement of the two hands, after they have divided at the top of the leg, so that they end up parallel to one another when they begin their downward journey back towards the calf. This means that the inside hand must move considerably more slowly than the outside one. You can, of course, just move it at the same speed and then let it rest in place until the left catches up. The stroke feels nicest, however, if you can somehow work it out so that both hands stay constantly in motion.A nice variation: move the hands up the leg as before, but coming down use just your fingertips and make the pressure as light as possible – as if you were stroking the skin with feathers..Repeat the main stroke three or more times.
2. For the next stroke, place the palm of your left hand flat against the outer side of the person’s foreleg.Have the hand halfway between the ankle and the knee, with the fingertips pointing towards the knee. Now, looking at the inner side of the person’s foreleg, picture this side as divided into three parallel strips running from ankle to knee. Place your right hand at the ankle end of the topmost strip with fingertips pointing towards the knee.Then, holding the left hand in place, slowly glide the right hand along this topmost strip until the fingertips are just short of the knee. Then bring it back to the ankle, leading now with the heel of the hand, without any change in the speed or pressure of your stroke. The left hand stays in place the whole time. However, it exerts pressure in opposition to the moving right hand so that the muscles of the foreleg are gently squeezed between.After covering the first strip once both forwards and backwards, do the next two strips in succession. Then place the right hand flat against the inner side of the foreleg, and with the left hand do three strips in exactly the same fashion on the outer side.Next move to the thigh (or, if you prefer, to our next stroke for the knee and then to the thigh) and follow the same sequence. However, since the thigh is wider you will here have to do four or more strips on each side. On the inner side let each strip run from a point parallel to the knee to the crease in the skin between thigh and pelvis. The strips on the outer side should also begin at a point parallel to the knee, but should go on to include the hip as well; let the fingertips of the left hand make contact with the edge of the hip bone each time before returning.
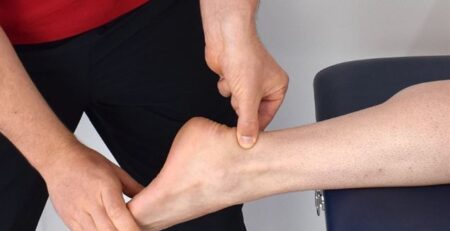
3. Now the knee!This is one of my favorites. The person may well discover for the first time what a pleasure it can be to have a knee. Although it looks complicated, the stroke is fairly simple. Begin by placing the crossed tips of both thumbs against the lower edge of the kneecap. Next with the tip of the left thumb circle the edge of the kneecap. Move to the right (in other words, counterclockwise), and make a complete circle. You will find a small furrow between the edge of the kneecap and the bone underneath; press the tip of the thumb into this furrow with a light but steady pressure. Then do the same thing with the right thumb, this time starting to the left, or clockwise.Now for the actual stroke, merely move both thumbs at once exactly as you moved them separately. First bring them up either side, then let them cross at the top, and then finish by bringing each thumb down the side opposite that from which it started. At the bottom of the kneecap cross them again and you are ready to begin another circle. Do three or more slow circles without lifting your thumbs or stopping. Afterwards drum lightly all over the top of the kneecap for several seconds with the fingertips of both hands. Finish by gently rubbing the sides of the knee with the fingers of both hands at once. Make half a dozen or so wide circles on either side of the knee.
4. For the next two strokes the person’s leg must be raised so that the knee rests in the air.Lift with your left hand from beneath the knee while with your right hand you slide the foot until it is parallel to the knee of the opposite leg; the knee should be high enough for the leg to be almost able to balance in place. Next, if working on a table, anchor the leg in place by backing up and sitting so that you gently pin the person’s toes under your own right buttock. If you are working on the floor, kneel and hold his foot between your own knees.Now, lightly clenching your right fist, reach under the leg from the right and with the inside of your forearm massage the calf muscles on the underside of the person’s foreleg. Starting with the inside of your wrist at the base of the calf, work in long narrow circles going first from left to right. As you come up the left (from where you are facing) side of the calf, keep sliding your forearm to the left so that by the time you have made it to the top of the calf you have almost reached the crook of your elbow.Coming down again on the right side, slide your forearm back to the right until the inside of your wrist is once more against the base of the person’s calf.Circle two more times in the same direction, then another three times in the opposite direction. Give this stroke your best attention: it is also one of everybody’s favorites.
5. This one is called ‘rolling’ the thigh. Leave the person’s leg in the same raised position that you used for the previous stroke.Place your palms on either side of the thigh just below the knee, your fingers extended outwards. Now vigorously move both hands back and forth, moving the left hand forwards (i.e., in the direction of its own fingertips) while the right hand moves back (i.e., in the direction of its own heel), and vice versa; and at the same time slowly work both hands down the length of the thigh. Continue down the thigh almost to the pelvis, and then return upwards with the same motion. Repeat the entire stroke one more time.As with the arm and hand, Its preferred to massage the right leg and the right foot before going on to the left leg and foot. If you wish to do the same, follow your work on the right leg by going on to the next section for the foot.
I hope this completely free write up on the full body massage was helpful to some of you. Massage is the first EVER way to heal your body. When we get hit the first thing we do is hold and rub the area, showing you the power of massage. I hope you find a partner to share and trade massage with and learn to massage a little bit and get some FREE relief.

